




Welcome!

Thanks for stopping by my little blog! Enjoy looking around, and please say Hi!
Showing posts with label Guest blogger. Show all posts

Monday, March 7, 2011

Guest Blogger - Ea from Finding Bliss...

Happy Monday my friends!  I hope your weekend was just as fab as mine!  To start off the week I have some creative inspiration from Ea of Finding Bliss...  Stop by her blog to learn a little bit about her, and keep reading, I promise you wont be disappointed ;) 

With all of the electronic gadgets in our home I needed one central station to keep things organized ….so I created our “charging station” out of baskets from the local thrift shop.  It’s been with us for a while now… at first we used it to hold my phone, and my kids’ calculators and handheld games…but now that they are teens it holds ipods, phones, and cameras….and still the calculator!

Here is how I made it:
 Find a top basket~ Figure out what objects you would like to store and then find a basket that will accommodate them with a bit of wiggle room ~ you’ll need this when you place your electronics in and attach the power cords.

Find a bottom basket~ this is the basket that will hold your power strip and all of your charging cords.  To ensure that everything will fit,  plug all of your cords into a power strip before you get the basket to get a visual of the dimensions you will be needing.


Monday, February 21, 2011

Guest Blogger - Julie from Singing Three Little Birds

 I hope you are enjoying all my guest bloggers as much as I am.
Its so great to get new ideas and learn about some new blogs!
And a big thanks to all of my guest bloggers. . . you all are great!
Now onto our guest for today - lets show her a big Ready-Set-Create welcome!


Hello and thanks for having me here today!

My name is Julie and I write a little blog called Singing Three Little Birds. When I'm not blogging about my crafts and kids, creating new items for my etsy shop or chasing my kiddos around, I work full-time as a children's librarian. I am a pretty busy mom!

This month I challenged myself to create a new rose everyday. Being a really busy mom and all, I haven't come close to creating one everyday but it has been fun trying. I have been using different materials that I haven't tried before.
Here are a few favorites.
White lace
Denim
Double ruffle ribbon
A zipper!
Have you challenged yourself recently? I'd love for you to stop by and tell me about it.
I also have a weekly linky party called Inspire Me Mondays.
Come link up your projects and show me some inspiration.

Thanks so much for having me here today! I hope you'll stop by soon.
Julie @ Singing Three Little Birds

Thursday, February 17, 2011

Guest Blogger - Karen from Pocket Full of Pink

Hey!  This is Karen from Pocket Full of Pink and I am so excited to be a guest post on Ready-Set-Create!   Thanks Aleesha!

First let me introduce myself.  My name is Karen and I am 40 something:)  I still feel like I am about 20 though!  It's hard to believe I have 3 kids, 16 (almost 17yr. old daughter), 14 yr. old son, and a 9 yr old daughter.  They are very busy and SUPER good kids.  I can't help but brag about them.  I am such a proud mom!

Right now I am going back to school at a community college to finish up my associates degree, then on to a 4 year college in 2012.  I just started in September after staying home with the kiddos for about 16 yrs!  I am having a blast.  I highly recommend it:)

Now, enough about me and my B-O-R-I-N-G life!  On to a fun craft.  Today I am going to show you how to make an adorable Dog tag necklace with scrapbook paper!

Here is what you will need:
-Dog tag (purchased HERE)
-Mod Podge
-a piece of pretty patterned scrapbook paper
-craft knife
-self-healing cutting surface
-glue gun
-paper flower or whatever you want to embellish your necklace with!
-emery board
-ribbon or ball chain

Here we go!  First put your dog tag down on the wrong side of the scrapbook paper and trace around it like this:
Next, cut it out with the craft knife, being careful not to rip the paper.
Then, slap some mod podge all over the wrong side of the paper and glue that baby on the dog tag, matching up edges. Let it dry for about 1/2 hour.  Then add a letter sticker for whoever you are making it for.  Add some more mod podge on the top of the paper once you have attached the paper to the dog tag.
OOOh, love that nice blue mat!  Yes, it has been well used.

Let the mod podge dry for at least 1-2 hours.  Then using an emery board, sand gently around the edges, making sure you are working down, so not to lift the paper off the dog tag.
Next add embellishments!  I added a paper flower with a pink round pearl in the center.OOPSEY!! I couldn't tell where the glue was going.  It's hard to take picture's while you are crafting:) You get the idea, right?

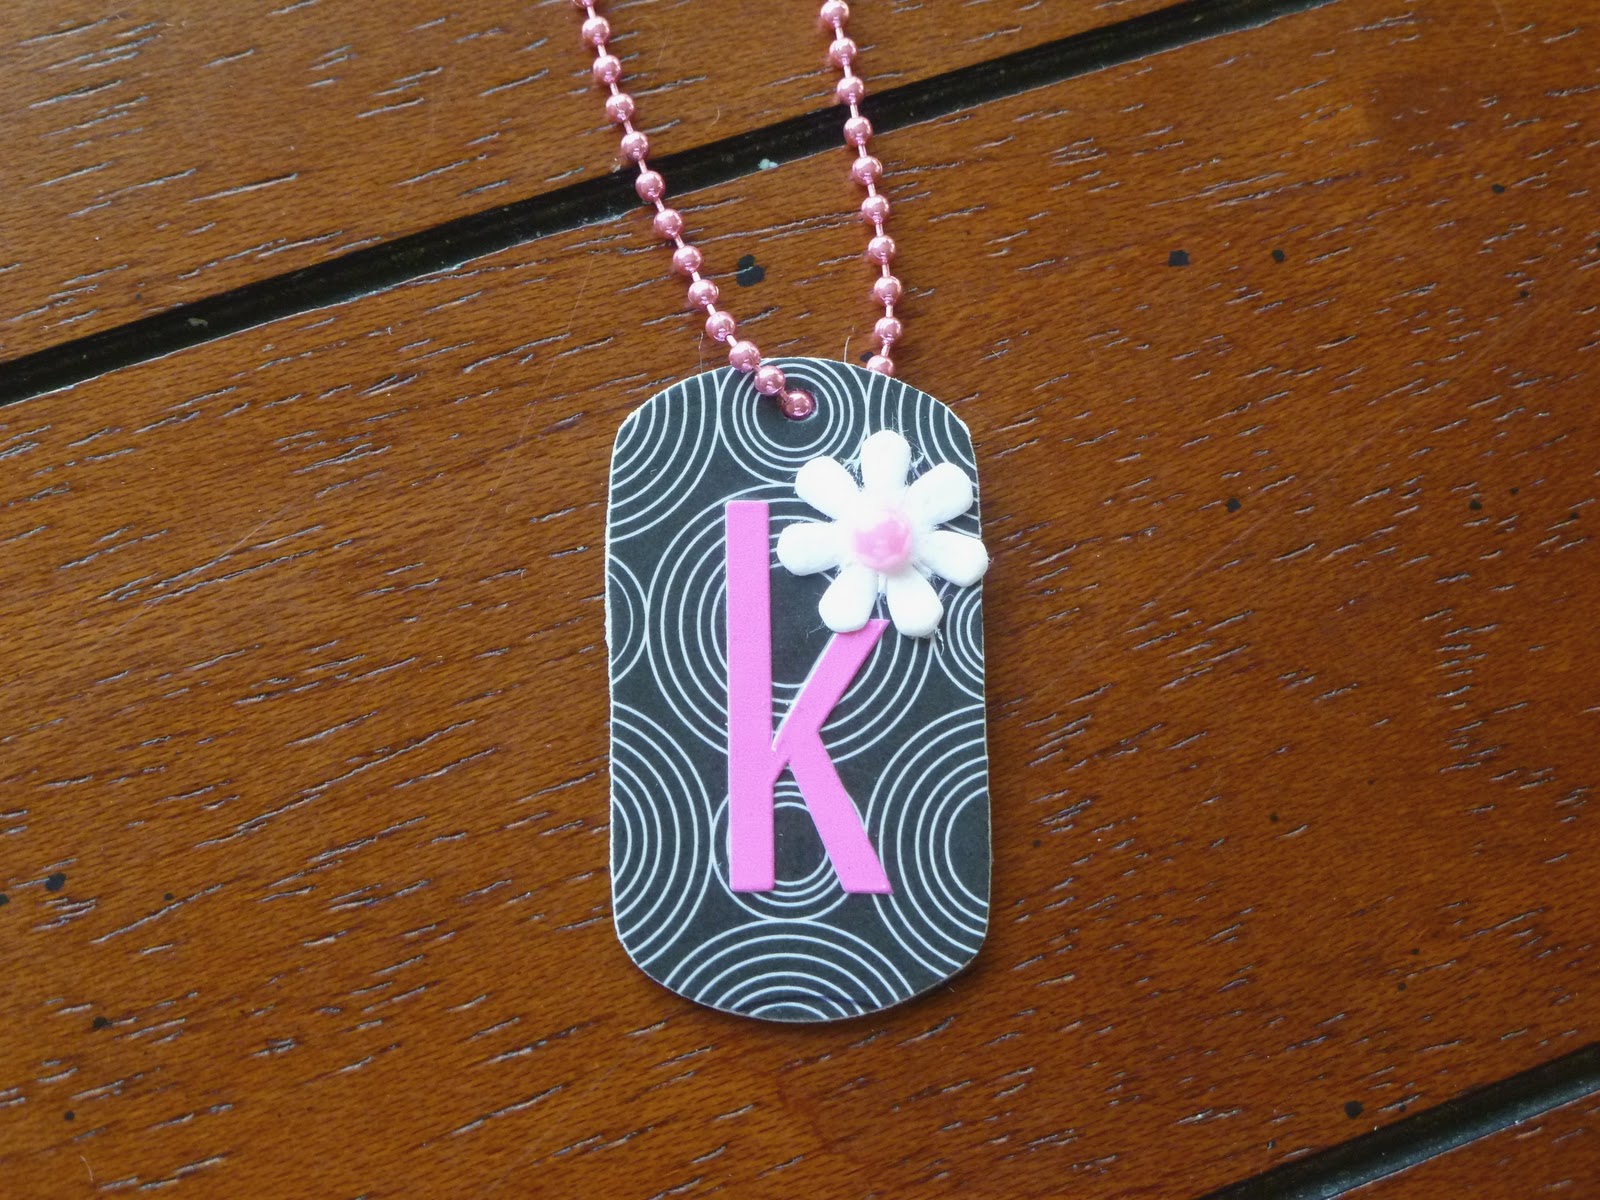
Here is the finished necklace!  I used a pink ball chain that I purchased HERE
Here's another one I made. 
Thanks Aleesha for having me here! 
Stop by my blog Pocket Full of Pink anytime for Giveaways, tutorials, or recipes, or the latest crafts I am working on!


Tuesday, February 15, 2011

Guest Blogger - Megan from The Bug Creator

I hope you all had a fun, fab Valentines Day that was full of love!
I'm super excited to have another guest blogger today. . . Make sure you stop by her blog and spread the love!

Hello there ready set create fans! 

I am so excited that Aleesha is letting me guest post here today.

I guess the polite thing to do would be to introduce myself... My name is Megan. I am 24 years young and a single mommy to a wonderful little boy that just turned 1 year old! I am also the writer for The Bug Creator blog.

Bug Creator - Crafts and Life

Being a single parent is not easy, and sometimes I get overwhelmed having this tiny person depend on me and only me 24 hours a day, 365 days a year. . But when it comes to planning a party I shine! So when my son's (bug)  first birthday started getting close (okay maybe it was 4 months ahead of time) I started planning how to do the party the cheapest way possible, to accommodate my budget, while not compromising the greatness of the party. 

I did a entire 1st birthday party for 48 people (38 were able to come) in well under $100!

So how'd I do it? Easy! 

-Made the cake myself ($22.76)

- Made all the decorations in photoshop & printed on cardstock I already had ($0)

-Purchased the invitations using codes for % off and free codes on Shutterfly.com ($.85)

-Did 16 goodie bags by going to the dollar tree, and clearance sections of wal-mart.($12.54)

The most expensive part of the whole thing was food which ended up costing around $52.00 for 38 people and we had some left!

Total party cost: $88.15
 for a party for 38 people... (we planned for 48 though)

Think that is impressive? I did my entire mistake wedding for $600 and it was amazing! 
(that included my dress & food)

Want to see photos? I know you do! 

(All photos were taken by an amazing photographer Jebbica @ Photos By Jebbica the ones that do not have her copyright were originals I edited ,graciously given to me because we forgot to grab snap shots with other cameras on the party...oops... lesson learned!)


16 little gift bags for our tiny guests...

In the bags-
bouncy balls, plastic bug, candy hearts, gummy works that we put in clear plastic bags left over from another party. 


Meat and cheese tray for food along with a fruit tray and some chips.


Cake:
4- 9inch double layer cakes 
dyed icing with gel color
Foam board to set it upon

I used a fork to "stab" the icing to make it a fuzzy caterpillar!


Dirt bowl- Crushed chocolate teddy grahams & gummy works thrown in...Big hit with the kids!


Banner- 8x10 cardstock made in photoshop using simple shapes and text

(thrifty wrapping with brown paper by my friend Emily)

(we had streamers from the dollar store going from our chandelier to each corner of the window and the banner on the window is made of cardstock )

Birthday boy


We even set up a tent tunnel for the kids to play in! Bug obviously thought it would be great to push my nephew through it. 


The cake was Bug Approved!


Awesome right? 

Don't forget to come visit me for tutorials, crafts, life, and more over @ The Bug Creator or on facebook

Thanks Aleesha for having me over! 

Tuesday, February 8, 2011

Guest Blogger - Crystal from Crystal's Craft Spot

Hi Everyone! I am so excited to be here today.
I am Crystal from Crystal's Craft Spot. Its my little spot to share my current craft projects, tutorials, recipes, and ideas I want to use in the future. I just started a monthly craft challenge (first link up today!), an online craft club, and Feature yourself Friday that I would love for you to join. I try to post something new almost everyday and I enjoy a variety of crafts. It is my way to relax and take a break from a busy day.

Here are a few of my favorite projects
 
Today I have a cute and quick craft for Valentine's day or any day.
The Valentine's Headband
and here's my little cutie pie wearing her new headband.
Start by cutting out 3 hearts from felt.  I stitched around the red for a fun look.  Hot glue the three together and glue on the buttons.
grab a plastic headband
add a bit of hot glue to one end and start wrapping the entire headband with yarn.  You can add glue do different parts of the headband to keep it secure.
A close up of the end.
It should look like this once you're done.
glue the hearts on your headband and you're done!  So cute for your little one or even for yourself.
Come by my blog any time for more fun ideas.  Thanks for having me today!

Friday, September 24, 2010

Blog Swapping with Night Owl Crafting

I am super excited to have Leslie from Night Owl Crafting here today!  
If you're not already familiar with her blog, it is fab!  
And I absolutly love the name of her blog!  Aren't we all Night Owl Crafters sometimes? :) 


Hello Ready Set Create followers! I am so excited that Aleesha is letting me take over her fabulous blog today!  I love following her blog and checking out all her cute creations!


Let me introduce myself! My name is Leslie and I am the creator of

Night Owl Crafting.


I started blogging back in 2008 and decided that my personal blog was being over taken by my crafts. So I started my craft blog to share my creations and inspirations that I receive from fellow bloggers and crafters. I host 2 link parties each week. The first one is on Tuesdays and it is called


Hoo are you Tuesdays! 


NightOwlCrafting


This party is where you answer a few questions I ask each week and then link up your post! This is a party to get to know each other outside the craft world! 


The other one is held every Wednesday and it is called  


This link party is where you can come and show off whatever you have been making!

I hope you will come and link up to both parties!


I am in love with SUBWAY ART right now!
Here is my fall subway art I created.


I enjoy sewing!


I recently made this reversible apron for a friend!


Here is a little handbag/ scripture tote.


I made a changing pad and it even has a tutorial!


I like to make decorations for my home!

I had so much fun making these adorable fabric pinwheels!


I am loving Washi Tape! What is it you ask? It is Japanese tape that you can decorate with! I have decorated my vases with it and covered clothespins as well!


I also LOVE vinyl!


I make these cute family name frames!


I think it turned out darling! I just set up my Etsy account and have these available in black or brown and with or without ribbon.


Today I would love to show you my latest projects!

In the spring I made lady bugs out of pavers and I knew that come fall I would love to make pumpkins.
So here is the tutorial for my pumpkin payvers.


Supplies

payvers
orange and brown paint
wire, ribbon, fabric, or raffia
paint brush

Step 1~ paint your paver orange. I spray painted mine.

Step 2~ Paint the stem brown. I used paint and a paint brush to do this, because it got dark before I could cover the bottom part and spray paint the stem.

Step 3~ Grab some wire, ribbon, fabric, raffia, or what ever you like to
tie between the stem and the pumpkin.

I used green wire and curled the ends.

Now you have a cute little  pumpkin. It is really that easy.

I have so many more cute projects that you should come and check out over at Night Owl Crafting and please come join my link parties! I love meeting new HOOTS!


Thanks Aleesha so much for swapping with me today. I had a FABULOUS time!


Related Posts with Thumbnails