Welcome!

Thanks for stopping by my little blog! Enjoy looking around, and please say Hi!

Friday, June 25, 2010

Yes. . . Another Necklace!

I know, I know! But yes. . . I have another necklace for you.
But cut me a break, its a really cute necklace!

See?!?!
So totally cute right?!
You'd never know it was made from a button.

Here's how I did it.
I got the button from WalMart.
First I clipped off the back of the button with some wire cutters.
Then I sanded it down more with a metal file.
Next I glued a bail to the back and let it dry for a few hours.
(No one will ever see the back of the necklace, but if you want it to look a little better of if its a little too scratchy against your skin you could always glue a little circle of felt or black fabric to the back.)

Then you have a cute new necklace pendant!
Just put it on a chain and you're done!
I ♥ it! Its my new favorite necklace!


Tuesday, June 22, 2010

Skirt Week

The blog Crafterhours is doing something so fun this week. . .
It is Skirt Week!

A whole week of skirts.
All different kinds of skirts. . .
With lots of pictures from lots different sites.

I'm looking forward to getting lots of ideas, and one of these days, I'm gonna make me a skirt.
Hop on over and see if you find something you like!


Wednesday, June 16, 2010

Craft Room Organization

How do you organize your crafying supplies?
I recently made some cute and so functional boxes to keep all my junk supplies in.

Here is a before look at my craft room.
I keep my supplies in the dresser and as you can see stuff is spilling out all over the room.
Its not fun to dig through piles of stuff when I need something.

I got this idea here from Make it and Love it. She made boxes just the size she needed by cutting up old boxes and hot gluing them together. Such a smart lady!

So I figured out how big I wanted my boxes to be. 10x10x10 Easy
Then I cut 5 10 inch squares for each box.
Next comes the glue. I used quite a bit cuz I wanted to make sure they were sturdy.
Beware: this is a messy project. (But the end result is worth it)
Once the glue dries I spray painted the sides black.
For the front I mod podged some paper to the front. I think fabric would've probably looked better, but whatever.

Look at my craft room now! SO much better right?!
I gotta say, my Hubby thought I was crazy, making boxes out of boxes. I don't blame him. But look at this finished project!
Ah, to be able to see the floor again!


Thursday, June 10, 2010

Pendant Necklace!

Anyone who is a frequent visitor of this here blog, may have noticed that
I ♥ jewelry!
I've been making a lot of my own jewelry lately.
Its awesome cuz now I have so many pieces to choose from and I haven't broken the bank.

Let me show you how I made this fab necklace pendant.
This is the same type of necklace that I gave away on my 100 follower post.

Here is what you'll need:
Wooden squares
Scrapbook paper
Mod Podge
Hardening epoxy glaze
Bail
Glue (super or gorilla)

I started with some wooden squares. (Any shape wooden piece would work for this.)
I made a little template to help me choose just the right paper.
Next I cut out my square of paper and mod podged them to the squares.
Give them a couple coats and let it dry completely.
Next put on a thin coat of whatever glaze you're gonna use.
Make sure you cover the whole thing.
To get rid of the tiny bubbles I used a lighter and held the flame a few inches above it. It pops them like a charm. Then I covered them with a box to keep the dust off, and let them dry and harden for 48 hours.
Once its dry, glue a bail to the back.
Look how cute they are!
I've made a bunch. . . one for every outfit! *Ü*

Monday, June 7, 2010

Giveaway Winners!

Thanks to everyone who entered my giveaway!
I wish I could make something for you all!
(The hubby would love that right?)

Here are our winners. I was feeling generous so I picked three.


Ashley said...I love #1 and #6.


Deanna and Christian said...I LOVE LOVE LOVE #3. SO SO MUCH!!! I love your work, you really are amazing.

Dawn said...I'd love to win number 4 its too cute


Congrats Ladies! I'll be contacting you soon!
Happy Monday!


Tuesday, June 1, 2010

Totally Fab Display Board

Have you seen some of the various display boards out there in blogworld?
I made my own variation that turned out so totally fab, so I thought I'd show you!

Supplies;
A piece of wood at your chosen length
Some Jumbo wooden paperclips - as many as you'd like
Fabric - two different colors
Mod Podge
Hot glue gun
Embellishments

Start with your board and which ever fabric you'd like to cover it with.
Cut your fabric slightly larger than your board. (Make sure that you have enough to cover the sides and part of the back.) Give the front side of your board a coat of Mod Podge and lay the piece of fabric you cut right on top. Smooth it on and let it dry.
Once it is dry flip it over and mod podge the edges of the fabric down on the back. (Sorry I don't have a pic if this step) Don't worry about how the back looks, nobody is ever gonna see it! Next put a coat of mod podge on the top of the fabric on the front side. This will make the paperclips stay on better.
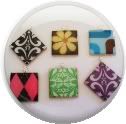
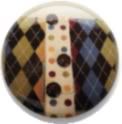
While it dries we will cover the paperclips with fabric. Trace around the front of the clip on the fabric and cut it out.
We're going to stick this fabric on the same way as we did on the board, One coat of mod podge on the bottom, then fabric, then another coat on the top.
Once its all good and dry, we'll stick it all together with the glue gun. Just glue the paper clips right on the board where ever you want them to go. Last stick on a few embellishments, whatever you want. I added a few buttons to mine and I think it adds a lot.
Find a good place to hang it, and there you go! So Cute!
It matches the pen holders that I made for my desk a while back.
Here is another one I made for my Mom for her birthday.
I'm not sure which one I like better, cuz I think they are both so friggin cute!


Related Posts with Thumbnails