Welcome!

Thanks for stopping by my little blog! Enjoy looking around, and please say Hi!
Showing posts with label Wood. Show all posts

Monday, November 22, 2010

12 Crafts of Christmas part 7 - Christmas Countdown Blocks

Christmas is getting close!  How many days do we have left???  I don't know, let me go count it up on the calender.  No, wait. . . Let me check my new Days til Christmas countdown blocks!

{Ok, there is not 10 days left, but you get the idea.}
I love being reminded that Christmas is getting closer, don't you?!
Wanna make one? 

What you'll need;
two square blocks - you can get these from the craft store.
a piece of wood for the base - I used a 2x4 cut a little longer than the two blocks put together
paint
Christmas paper (scrapbook or wrapping paper would work)
numbers to put on the blocks I used stickers but vinyl would work too.
"Days 'til Christmas" printout for the base or vinyl or marker
glue or mod podge
First step, paint all the wooden pieces.
next cut your paper the size of your blocks, or maybe slightly smaller.  You'll need to cover all six sides.
Glue or mod podge them on and let them dry.
For my base I just printed out "Days 'til Christmas" on regular computer paper and mod podged it right on the base.  But you could use vinyl or even a marker and just write it on.

Now its time to stick on the numbers.  On the first block you are going to put numbers 0,1,2,3,4,5 and on the second block you are going to put 0,1,2,6,7,8 (note: your 6 will also double as your 9 so make sure it looks like a 9 when turned upside down!)
Now its time to display them. . . almost.  Your new blocks will count down from 32 days til Christmas all the way down to 0!
What a perfect way to keep track of how many days left, without all the mess and bulk of other methods like the good ol' paper chains!

Happy Christmas Crafting!


Monday, October 11, 2010

I Do Believe In Spooks!

I'm not super big into Halloween, but I do like a little a little bit of seasonal decor around.
Here is my latest creation.  
Isn't it Fun?!  
I love the phrase and I ♥ The Wizard of OZ!

I got the idea from You Craft Me Up and just had to try it out for myself. {though I cant believe I didn't think of it first!}

Here is my how to.

Heres what you need:
Wood
Fabric
Mod Podge
Letters Printed in outline form
Scissors
First I covered the board with the fabric.  Mod Podge all over the board and then press the fabric onto it.

While it dries print and cut out your letters.  To get the outline shape you just type everything out then go under format, then font and select outline.  
Easy Peasy.

Next cut out your letters.  It didn't take as long as you'd think, and was pretty simple, but really you could use punch out letters, or maybe stickers. {Not sure really if stickers would work but you could try.}  Or of course you could use vinyl letters. 

Lastly, arrange your letters how you want and stick them down by coating the back of the letters {only} with Mod Podge and sticking them in place.
Once they are dry, bam! Your Done!

There you have it!
Thanks for reading, and happy creating this week!


Thursday, September 16, 2010

A new life for an old curtain!

 I did a little decorating with an old curtain we had sitting in the closet . . .
Yes, a little decorating done with a shower curtain!

The Hubs and I got this shower curtain 3 1/2 years ago when we first got married. 
Pretty, neutral, but kinda plain . . .  It was time for it to get a new life!
Its perfect fabric for doing some recovering! 

First I made some "art" if you will for the wall.
 I love these on the wall!  They are big, yet simple and I love the way they turned out!

I started with some squares of wood, some batting and my staple gun!
Its as easy as cover, wrap and staple.

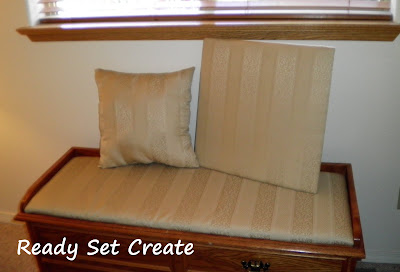
Next I covered the cushion on our cedar chest.  It used to be a flowery blue. . . that didn't match with anything.  With the leftover I made a little throw pillow.  
Its great to be able to re-purpose something that was just sitting on the shelf, and even better to have some great {free} fabric for my projects!
What do you have sitting around that you can give a new life to???

Sunday, August 1, 2010

Necklace Holder

With all these necklaces I've been making its only natural that now I need to make a place to hang them all!
So here is what I came up with.
Cute, easy, functional with lots of space to hang as many necklaces as I'd like!
In case you're interested in making one yourself, here is how I made it.

I started with a board, a 1x4 about 12 inches long.
Some fabric cut larger than my board
Hooks - I used 3 double robe hooks that i found at Walmart
Mod Podge
First I covered the board with Mod Podge and then smoothed my fabric over the board. When it dries give it another coat over the top.
For the back I just folded over the fabric and Mod Podged it down.
Once it is dry, position and screw in the hooks.
And there you have it!
Look how much room there is to hold so many necklaces!
And no more tangled messes!

Thursday, June 10, 2010

Pendant Necklace!

Anyone who is a frequent visitor of this here blog, may have noticed that
I ♥ jewelry!
I've been making a lot of my own jewelry lately.
Its awesome cuz now I have so many pieces to choose from and I haven't broken the bank.

Let me show you how I made this fab necklace pendant.
This is the same type of necklace that I gave away on my 100 follower post.

Here is what you'll need:
Wooden squares
Scrapbook paper
Mod Podge
Hardening epoxy glaze
Bail
Glue (super or gorilla)

I started with some wooden squares. (Any shape wooden piece would work for this.)
I made a little template to help me choose just the right paper.
Next I cut out my square of paper and mod podged them to the squares.
Give them a couple coats and let it dry completely.
Next put on a thin coat of whatever glaze you're gonna use.
Make sure you cover the whole thing.
To get rid of the tiny bubbles I used a lighter and held the flame a few inches above it. It pops them like a charm. Then I covered them with a box to keep the dust off, and let them dry and harden for 48 hours.
Once its dry, glue a bail to the back.
Look how cute they are!
I've made a bunch. . . one for every outfit! *Ü*

Tuesday, June 1, 2010

Totally Fab Display Board

Have you seen some of the various display boards out there in blogworld?
I made my own variation that turned out so totally fab, so I thought I'd show you!

Supplies;
A piece of wood at your chosen length
Some Jumbo wooden paperclips - as many as you'd like
Fabric - two different colors
Mod Podge
Hot glue gun
Embellishments

Start with your board and which ever fabric you'd like to cover it with.
Cut your fabric slightly larger than your board. (Make sure that you have enough to cover the sides and part of the back.) Give the front side of your board a coat of Mod Podge and lay the piece of fabric you cut right on top. Smooth it on and let it dry.
Once it is dry flip it over and mod podge the edges of the fabric down on the back. (Sorry I don't have a pic if this step) Don't worry about how the back looks, nobody is ever gonna see it! Next put a coat of mod podge on the top of the fabric on the front side. This will make the paperclips stay on better.
While it dries we will cover the paperclips with fabric. Trace around the front of the clip on the fabric and cut it out.
We're going to stick this fabric on the same way as we did on the board, One coat of mod podge on the bottom, then fabric, then another coat on the top.
Once its all good and dry, we'll stick it all together with the glue gun. Just glue the paper clips right on the board where ever you want them to go. Last stick on a few embellishments, whatever you want. I added a few buttons to mine and I think it adds a lot.
Find a good place to hang it, and there you go! So Cute!
It matches the pen holders that I made for my desk a while back.
Here is another one I made for my Mom for her birthday.
I'm not sure which one I like better, cuz I think they are both so friggin cute!


Related Posts with Thumbnails