I love photo Christmas cards!
I love having them made and sending them out to all our friends and family!
What I don't love is the price.
Depending on where you buy them and how many you get, it can sometimes get kinda pricey.
I'll show you how to make them for free! {or dang near free anyway}
Start with whatever pictures you are going to use and edit them as necessary.
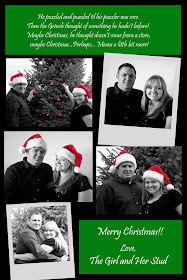
First I'm gonna show you how I made the collage card.
To make the words on the card I used Paint.net
If you don't already use it, you should! Its free and super easy to teach yourself! (I suppose you could probably use paintbrush for this also.)
Ok, so in Paint, create your word squares the size and color you want them, and them save them to your computer in JPEG format.
Next we are going to use Picasa (another easy and free program) to easily create our collage.
Once you download it it automatically uploads all your pics on your computer. Nice right?!
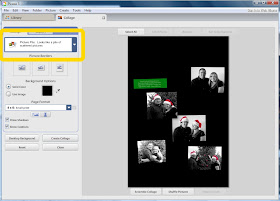
Ok, so in Picasa select all the items you want in your photo card {pictures and words etc.} then click on the Collage button.
This will put them into a collage for you and you just need to play with it and arrange it all to your liking.
You can change the layout of the pictures using one of the layouts in the settings or you can drag and re-size each picture as you wish.
You can also add borders to your pictures, change the background color and choose the size of your collage.
I made my collage 4x6 because I plan to have them printed at the store.
It took me a little while and a few tries til I ended up with one I was happy enough with to send to everyone.
Once you are finished, click Create Collage and there it is!
Like I said before, I made my collage 4x6 because I plan to have them printed at the store.
I can get them printed any number of places for only pennies a piece.
{Just a little tip - most online photo sites offer new customers 50-100 free prints! So you could get them printed for Freeee!!}
Ok, now on to the second card.
For this one I only used paint.net.
I created three layers. By using different layers you are able to edit and move each item independently of the other items in your card.
The first layer {or background} is your background color and any text you want. Easy.
{Make sure you make this 4x6 if you plan to have these printed at the store, or whatever size you'd like.}
Next create a layer using your picture. Resize and edit as necessary.
My last layer is this cute little tree image I used. You could draw/create your own image or paste in a clip art image or really whatever you'd like.
Then combine all your layers and there you have your custom made-by-you Christmas card!
So there you have it. I hope this made sense. Like I said, the programs take a little playing around with but you'll get the hang of it, and how great would it be to be able to send out Christmas Cards that you made!
Good luck, feel free to email me with any questions and happy digital creating!


Thanks for sharing this. I love cards with photos and I think I may give this a try this year.
ReplyDeleteSuzie @
staycalmandsewsomething.blogspot.com
Thank you so much for sharing! I always do photo cards and I think I will give this a try this year!
ReplyDeletexoxo
Kelli @
loveoursimplelife.blogspot.com
You are sooo talented and crafty!!! I LOOOOVE looking at what you've done.
ReplyDeleteWOW!! Great tutorial! Thanks!! Visiting from New Friend Friday!
ReplyDeleteGood job ! This is very good !
ReplyDeleteNice job on your cards. I'll have to take a look at Paint.net, thanks!
ReplyDeleteThank you so much! I love my photo cards at christmas, but like you I hate the price! Im gonna give this a try! Thanks again!
ReplyDelete